Slice
Jump to navigation
Jump to search
The printable version is no longer supported and may have rendering errors. Please update your browser bookmarks and please use the default browser print function instead.
slice creates a slice object from a map object.
USAGE
slice_new name, map, [state, [source_state]]
or
slice name, map, [state, [source_state]]
ARGUMENTS
- name = the name for the new slice object (string)
- map = the name of the map object to use for computing the slice (string)
- state = the state into which the object should be loaded (default=1; set state=0 to append new mesh as a new state)
- source_state = the state of the map from which the object should be loaded (default=0)
EXAMPLES
# Create a map slice plane perpendicular to current view
slice a_new_slice, a_map


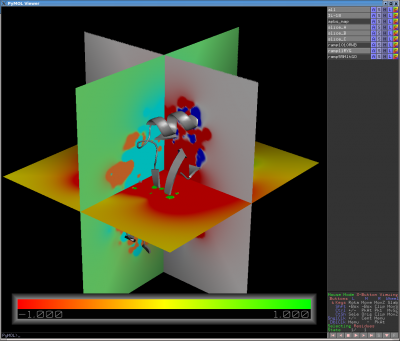
# A more complicated example that shows how to create multiple slices
# (in this case, 3 slices perpendicular to each other), each colored
# with a different color ramp and different contour levels:

# Reset the view, to align view on XYZ axes
reset
# (Optional: Adjust view direction to your liking)
# Create a map slice *perpendicular* to the current view.
# The slice seems to be in the center of the APBS (or other) volmap. Map "tracking" is off by default.
slice slice_A, apbs_map
# Rotate camera 90 degrees about the vertical axis
turn y, 90
# Second, perpendicular, slice
slice slice_B, apbs_map
# Rotate again, this time about the horizontal
turn x, 90
# Third slice
slice slice_C, apbs_map

# Define new color ramps: ramp_name, map_object, list of low/mid/hi values, 3 RGB triplets
ramp_new ramp1010RWB, apbs_map, [-10,0,10], [ [1,0,0], [1,1,1], [0,0,1] ]
ramp_new ramp11RYG, apbs_map, [-1,0,1], [ [1,0,0], [1,1,0], [0,1,0] ]
ramp_new ramp55MltGO, apbs_map, [-5,0,5], [ [0,1,1], [0.5,1,0.5], [1,0.5,0.2] ]

# Color the map slices
color ramp1010RWB, slice_A
color ramp11RYG, slice_B
color ramp55MltGO, slice_C

# Adjust the fineness of the slice color gradations:
cmd.set('slice_grid',0.1) # normally at 0.3; much finer than 0.05 gets a bit slow

# Map slices can be moved, relative to other fixed objects (e.g., your protein/DNA/RNA),
# by turning tracking on (Action menu), and the using the Shift-MouseWheel to move
# the slice forward in and backward in Z. Adjust fineness of this Z-motion with:
#   cmd.set('mouse_wheel_scale',0.05) # normally at 0.5

# The result is shown in the image above.
PYMOL API
cmd.slice_new(string slice_name, string map_name, integer state=0, integer source_state=0)
NOTES
Mis-identified as "slice_map" in documentation. slice or slice_new is the correct command. Documentation also mentions two optional parameters which seem to be no longer supported (opacity = opacity of the new slice, and resolution = the number of pixels per sampling).
SEE ALSO
References
- PyMOL Source code
