Difference between revisions of "PyANM"
(Created page with "{{Infobox script-repo |type = plugin |filename = plugins/pyanm.py |author = Yuan Wang |license = - }} = Introduction = Elastic Network Models (ENM) have...") |
|||
| Line 13: | Line 13: | ||
= Dependencies = | = Dependencies = | ||
| − | PyANM requires Numerical Python (NumPy) to do all the matrix calculations. If you wish to use PyANM but don't have NumPy on your machine, please follow the download and build instructions [http://www.numpy.org/ here]. After installing NumPy, type the following line inside Pymol and if you don't see any error messages, you now have NumPy ready for Pymol! <source lang="python"> import numpy </source> | + | *PyANM requires Numerical Python (NumPy) to do all the matrix calculations. If you wish to use PyANM but don't have NumPy on your machine, please follow the download and build instructions [http://www.numpy.org/ here]. If you will be using PyANM on a Windows machine, installing a Python distribution such as [https://store.continuum.io/cshop/anaconda/ Anaconda] might be the easier. After installing NumPy, type the following line inside Pymol and if you don't see any error messages, you now have NumPy ready for Pymol! <source lang="python"> import numpy </source> |
| + | |||
| + | <br> | ||
| + | *Having [http://www.scipy.org/index.html# SciPy] might improve the performance of PyANM but it is not required. | ||
| + | |||
| + | *PyANM has only been tested for Pymol 1.1 and higher, using an earlier version on Pymol might cause problems. | ||
| + | |||
| + | = Installation = | ||
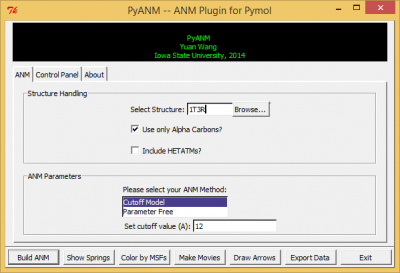
| + | Download pyanm.py from this page, then go to Pymol-->Plugin-->Manage Plugins-->Install..., select the file you have just downloaded and then restart Pymol. Things might be different depending on your Pymol version and your local system, but this should be fairly similar. [[File:PyANM_interface.png|400px|thumb|<b>Figure 1</b>: PyANM Interface]] | ||
| + | |||
| + | After a successful installation, go to Pymol-->Plugin and you will see PyANM, click on it and you should see PyANM's interface just like in figure 1. | ||
Revision as of 17:55, 19 October 2014
| Type | PyMOL Plugin |
|---|---|
| Download | plugins/pyanm.py |
| Author(s) | Yuan Wang |
| License | - |
| This code has been put under version control in the project Pymol-script-repo | |
Introduction
Elastic Network Models (ENM) have been successful in reproducing fluctuations for proteins of native conformations. ENM is a coarse-grained method for modeling protein dynamics, meaning in generally in ENM each residue is represented by one bead in its Alpha Carbon position. These beads are then connected by elastic springs if the distance between two beads fall under a cutoff value (usually within the range of 7 to 15 angstroms). For more details please read here.
PyANM is developed as a cross-platform Pymol Plugin to allow its users to build and visualize Anisotropic Network Models, a member of the ENM family. This plugin allows its users to draw arrows or make movies based on calculated mode motions, to draw all springs used to build the ANM within the protein, to color the protein based on its Mean Square Fluctuations (MSF) calculated from ANM and to export data from ANM for future processing. PyANM also allows its users to change the colors and scales (sizes) for movies or arrows generated by PyANM for better visualization.
Dependencies
- PyANM requires Numerical Python (NumPy) to do all the matrix calculations. If you wish to use PyANM but don't have NumPy on your machine, please follow the download and build instructions here. If you will be using PyANM on a Windows machine, installing a Python distribution such as Anaconda might be the easier. After installing NumPy, type the following line inside Pymol and if you don't see any error messages, you now have NumPy ready for Pymol!
import numpy
- Having SciPy might improve the performance of PyANM but it is not required.
- PyANM has only been tested for Pymol 1.1 and higher, using an earlier version on Pymol might cause problems.
Installation
Download pyanm.py from this page, then go to Pymol-->Plugin-->Manage Plugins-->Install..., select the file you have just downloaded and then restart Pymol. Things might be different depending on your Pymol version and your local system, but this should be fairly similar.
After a successful installation, go to Pymol-->Plugin and you will see PyANM, click on it and you should see PyANM's interface just like in figure 1.
