The printable version is no longer supported and may have rendering errors. Please update your browser bookmarks and please use the default browser print function instead.
PyMOLWiki Gallery
Cool PyMOL-generated Images and their Scripts.
Add Your Own
|
| Complex B&W outline representation |
What To Type
|
 |
| Description |
Making a B&W outlined image with depth.
|
| See Also |
|
|
|
# first load lipid model
load lipids.pdb;
# hide the initially loaded representation
hide all;
# set background color to white
bg_color white;
# show lipid model as sticks
show sticks, lipids;
# color the lipids model by element CHNOS #2 (carbon green)
util.cbag lipids;

# select all hydrogens and remove them from the model
select hideme, hydro;
hide everything, hideme;
delete hideme;

# create phosphate spheres
create phos, elem p;
hide everything, phos;
show spheres, phos;

# load helix model
load helix.pdb;
# hide the initially loaded representation
hide everything, helix;
# make the helical struct into a cartoon form
show cartoon, helix;
# style the cartoon form
cartoon putty;

# reposition the helix among the lipids using
# the 3-Button Editing Mouse Mode
# basically
# Shift+Left Mouse to rotate the helix
# Shift+Middle Mouse to move the helix
# also, you may want to make liberal use of the
# get_view and set_view commands.
#
# When you have the scene set like you want,
# continue with...

# move the model to find the view you want,
# and use get_view to get the coordinate description
get_view;

# set ray_trace_mode to black and white outline
set ray_trace_mode, 2;
- Version A: with all the elements except for the helix. This will become the background.
- Version B: with the 'front' elements, and the helix. Basically this is just a few 'layers' of lipid, with the helix among them. To do this:
- move the model around until you visually see the part to remove
- switch your Mouse Mode to 3-button viewing, then use the +Box selection (Shift+Left mouse) to select the 'background' portion to hide.
- choose Hide>Everything for the selection
- use the code from get_view to go back to the original view
Finally, you will need to compose the image in Photoshop (or Gimp, here I'll use Photoshop).
- Load the two versions.
- Select the white background in Version B, then choose Select>Color Range...
- Make sure 'Select' is set to 'Sampled Colors', and 'Fuzziness' is set to 150, then click okay.
- delete the white selection, then choose Select>All
- copy the picture, then switch to Version A and paste the selection (it should paste into its own layer as 'Layer 1')
- Click on 'Layer 0' (which is Version A) and change its opacity to 30%
- Create a new layer under 'Layer 0' which is filled with white only (or whatever background color you like)
- Click on 'Layer 1' (which is Version B), and using the Move tool (and nudge), align the molecules in 'Layer 1' to 'Layer 0'
- Some parts of 'Layer 1' are transparent and shouldn't be. Using the Paint Bucket tool fill in these areas with white (or whichever color you find appropriate).
- Admire your handiwork; put it in a publication, presentation, or poster.
|
| A "Sliced" Image |
What To Type
|
 |
| Description |
A more complex example of how to create an image of a slice.
|
| See Also |
|
|
|
# example script for creation of an image with a slice region
load $PYMOL_PATH/test/dat/1tii.pdb
orient

# must disable depth cue and shadows
unset depth_cue
unset ray_shadows
set ray_trace_mode, 0

# this controls the z depth of the slice plane
# (sets it halfway between the clipping planes)
fraction = 0.42
view = cmd.get_view()
near_dist = fraction*(view[16]-view[15])
far_dist = (view[16]-view[15]) - near_dist
cmd.clip("near", -near_dist)

# render opaque background image
as surface
set ray_interior_color, grey80
set opaque_background
set surface_color, white
ray
save image_back.png

cmd.clip("near", near_dist)
cmd.clip("far", far_dist)

# render the foreground image
as cartoon
util.cbc
unset opaque_background
ray
save image_front.png

# now use Photoshop, Gimp, or ImageMagick to combine the images
system composite image_front.png image_back.png image_merged.png
system display image_merged.png
|
| Grid Mode |
What To Type
|
 |
| Description |
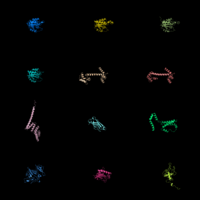
This image shows Grid Mode in action.
|
| See Also |
|
|
|
fetch 1cll 1sra 1ggz 5pnt 1rlw 1cdy;
set grid_mode
Hint: You may wish to execute the 'reset' command on the command line after running this mode to get full molecules in view of window and centered in a more useable manner.
|
| Cool Perspective |
What To Type
|
 |
| Description |
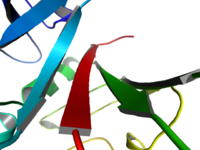
This image shows a perspective through Field_Of_View.
|
| See Also |
|
|
|
load prot.pdb;
zoom i. 46-49 and n. CA
set field_of_view, 60
ray
|
| Representing a binding pocket |
What To Type
|
 |
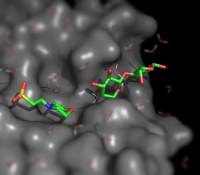
| Description |
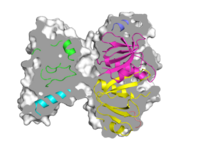
This image shows a nice way to show binding surfaces
|
| See Also |
|
|
|
load $TUT/1hpv.pdb, tmp
extract lig, organic
extract prot, polymer
delete tmp

set surface_carve_cutoff, 4.5
set surface_carve_selection, lig
set surface_carve_normal_cutoff, -0.1

show surface, prot within 8 of lig
set two_sided_lighting
set transparency, 0.5
show sticks, lig
orient lig

set surface_color, white
set surface_type, 2  # mesh
unset ray_shadows
|
| QuteMol Like |
What To Type
|
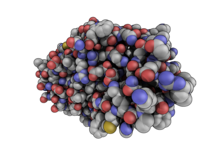 |
| Description |
QuteMol like image--modern feel to it. Check out the movie.
|
| See Also |
|
|
|
load $TUT/1hpv.pdb
set_color oxygen, [1.0,0.4,0.4]
set_color nitrogen, [0.5,0.5,1.0]
remove solvent
as spheres
util.cbaw
bg white
set light_count,10
set spec_count,1
set shininess, 10
set specular, 0.25
set ambient,0
set direct,0
set reflect,1.5
set ray_shadow_decay_factor, 0.1
set ray_shadow_decay_range, 2
unset depth_cue
# for added coolness
# set field_of_view, 60
ray
|
| Simulating Tilt-shift |
What To Type
|
 |
| Description |
Tilt shift simulation
|
| See Also |
|
|
|
fetch 1wld
as surface, poly
as sticks, org
h_add solvent
color grey, poly
orient org
png img.png
# now, go into Photoshop or the GIMP and apply a Gaussian or
# Focus blur to the top and bottom portions of the image
|
| Ray-normal-based transparency |
What To Type
|
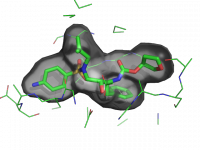 |
| Description |
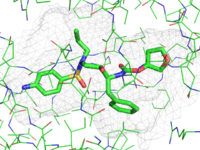
Ray-normal-based transparency
|
| See Also |
|
|
|
# grey surface
set surface_color, grey

# cavity mode
set surface_mode, 3

# layered transparency mode
set transparency_mode, 1

# surface transparency
set transparency, 0.5

# oblique and contrast define the
# look of the surface transparency:
# if the normal vector is
set ray_transparency_oblique
set ray_transparency_oblique_power, 8
set ray_transparency_contrast, 7

# fetch a protein, with a
# small molecule in a nice
# hidden pocket
fetch 1hpv, async=0

hide

# show the small molecule as surface
show surface, org

# arrange the view
orient org

# zoom back a little
zoom org, 1

# show the small molecule inside as sticks
show sticks, org

# show some nearby sidechains
show lines, poly within 5 of org

# enable frame caching for playback
set cache_frames, 1

set ray_trace_frames, 1

mset 1x120

movie.roll 1, 120, 1, x

mplay

# now sit back and wait 5 minutes...
|


