Difference between revisions of "Outline"
Jaredsampson (talk | contribs) (→Example: added "Automation" heading. Added `outfile` variable in imagemagick script, and adjusted filenames for consistency.) |
|||
| Line 64: | Line 64: | ||
See [http://www.imagemagick.org/script/composite.php this page] on ImageMagick for more information. If you need to use it with GraphicMagick or in Windows or Mac, search for the relevant guidances. | See [http://www.imagemagick.org/script/composite.php this page] on ImageMagick for more information. If you need to use it with GraphicMagick or in Windows or Mac, search for the relevant guidances. | ||
| − | If you need to erase the lines inside the border, you can use the following command to do it. The `color` variable is the desired final output color of the border. | + | If you need to erase the lines inside the border, you can use the following command to do it. The `color` variable is the desired final output color of the border; change the `width` variable to change the border's thickness. |
<source lang="bash"> | <source lang="bash"> | ||
infile="overlay.png" | infile="overlay.png" | ||
outfile="overlay_cleaned.png" | outfile="overlay_cleaned.png" | ||
| − | + | width=3 | |
w2=`convert $infile -format "%[fx:w-2]" info:` | w2=`convert $infile -format "%[fx:w-2]" info:` | ||
h2=`convert $infile -format "%[fx:h-2]" info:` | h2=`convert $infile -format "%[fx:h-2]" info:` | ||
| − | convert $infile -background white -flatten -fill black +opaque white -bordercolor | + | |
| + | convert $infile -background white -flatten -fill black +opaque white -bordercolor none -border 2 \ | ||
-fill none -draw "matte 2,2 floodfill matte $w2,2 floodfill matte $w2,$h2 floodfill matte 2,$h2 floodfill" \ | -fill none -draw "matte 2,2 floodfill matte $w2,2 floodfill matte $w2,$h2 floodfill matte 2,$h2 floodfill" \ | ||
-fill white +opaque none -fill black -opaque none \ | -fill white +opaque none -fill black -opaque none \ | ||
| − | -alpha off -morphology | + | -alpha off -morphology edge octagon:$width \ |
| − | -channel rgba -fill none +opaque white -fill $color -opaque white -shave | + | -channel rgba -fill none +opaque white -fill $color -opaque white -shave 2x2 $outfile |
</source> | </source> | ||
See [http://www.imagemagick.org/discourse-server/viewtopic.php?f=1&t=25970&p=113686#p113686 this thread] in ImageMagick forum for more detail. | See [http://www.imagemagick.org/discourse-server/viewtopic.php?f=1&t=25970&p=113686#p113686 this thread] in ImageMagick forum for more detail. | ||
Revision as of 14:49, 3 September 2014
Outline
There is currently (as of PyMOL v.1.7) no way to outline a selection directly within PyMOL. However, it can be accomplished indirectly with a composite image.
Relevant Settings
Example

Structure of Cytochrome C (PDB 3cyt) shown in surface representation.

Outline of residues within 2Å of Lys85 on chain I. Notice the image background is transparent.
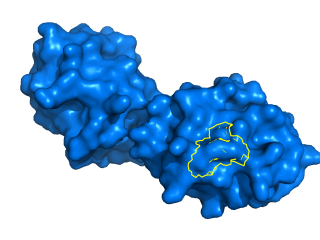
Composite of the previous 2 images.

The same composite image, cleaned up.


The following script was used to generate the first two images from PyMOL.
bg_color white

fetch 3cyt, async=0

as surface
color marine

select outline, br. chain I and resi 85 around 2

set_view (\
     0.061975956,   -0.950684488,    0.303902954,\
     0.703773856,    0.257531703,    0.662103057,\
    -0.707715809,    0.172843516,    0.685028315,\
     0.000000000,    0.000000000, -152.244812012,\
    25.274658203,    8.288025856,    9.110867500,\
    51.143974304,  253.345642090,  -20.000000000 )

png base.png, ray=1

hide everything
as surface, outline
set ray_trace_mode, 2
set ray_trace_color, yellow
set ray_opaque_background, 0

png overlay.png, ray=1
In an image editing program, position overlay.png in a layer exactly overlapping base.png. The extra outline lines can also (optionally) be cleaned up by carefully erasing them using the graphics program's eraser tool.
Automation
If you need to have a fully automated solution, you can use ImageMagick or GraphicMagick to do this. If you use ImageMagick in a Unix box, you can type this command on the terminal:
composite -gravity center overlay.png base.png composite.png
See this page on ImageMagick for more information. If you need to use it with GraphicMagick or in Windows or Mac, search for the relevant guidances.
If you need to erase the lines inside the border, you can use the following command to do it. The `color` variable is the desired final output color of the border; change the `width` variable to change the border's thickness.
infile="overlay.png"
outfile="overlay_cleaned.png"
width=3
w2=`convert $infile -format "%[fx:w-2]" info:`
h2=`convert $infile -format "%[fx:h-2]" info:`

convert $infile -background white -flatten -fill black +opaque white -bordercolor none -border 2 \
-fill none -draw "matte 2,2 floodfill matte $w2,2 floodfill matte $w2,$h2 floodfill matte 2,$h2 floodfill" \
-fill white +opaque none -fill black -opaque none \
-alpha off -morphology edge octagon:$width \
-channel rgba -fill none +opaque white -fill $color -opaque white -shave 2x2 $outfile
See this thread in ImageMagick forum for more detail.